Track Your Drupal Blog Stats with expo-MAX Real Analytics
Expo-MAX Real Analytics is a free web traffic analytics suite that gives you access to powerful
visitor tracking and website statistics tools. For bloggers running Drupal, expo-MAX Real Analytics
lets you gain valuable insight into how your readers interact with your content and how your blog
ranks in major search engines. Expo-MAX Real Analytics lets you:
 Analyze Backlinks – Find out what other bloggers consider noteworthy on your
blog by analyzing Referrer data and Traffic Sources. Analyze Backlinks – Find out what other bloggers consider noteworthy on your
blog by analyzing Referrer data and Traffic Sources.
 Track Search Engine Rankings – See which search terms readers use to find
your blog and check your ranking for each keyword on Google, Yahoo!, Bing and other search engine. Track Search Engine Rankings – See which search terms readers use to find
your blog and check your ranking for each keyword on Google, Yahoo!, Bing and other search engine.
 Calculate Bounce Rates – Discover which posts encourage readers to delve deeper into
your blog and which posts turn readers away. Calculate Bounce Rates – Discover which posts encourage readers to delve deeper into
your blog and which posts turn readers away.
 Optimize User Experiences – Understand which browsers, operating systems
and screen resolutions your readers use as well as their location so you can tailor your blog’s look
and feel for optimal viewing. Optimize User Experiences – Understand which browsers, operating systems
and screen resolutions your readers use as well as their location so you can tailor your blog’s look
and feel for optimal viewing.
You can integrate expo-MAX Real Analytics into your existing Drupal website or blog in just a few steps. Begin
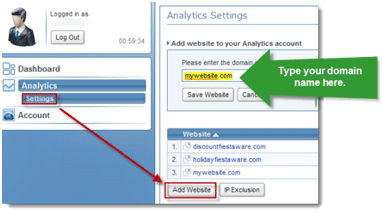
by visiting the expo-MAX Real Analytics Sign Up page to register. Once you’re signed up,
Click Add Website.
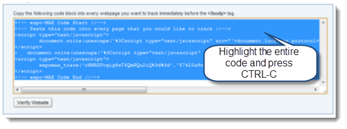
Your code will be generated automatically. Select it and Press CTRL-C to copy it to your
clipboard.
Basic expo-MAX Real Analytics Drupal Setup
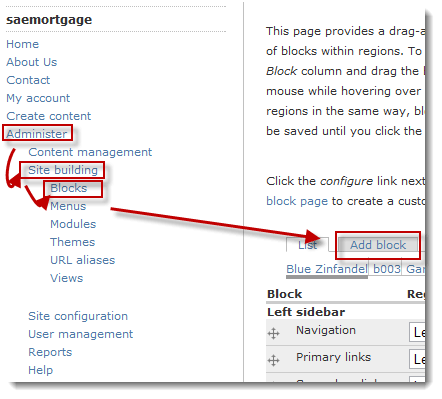
1. Log in to your Drupal account.
2. Click Administer and choose Blocks under Site building. Now, Click the
Add block tab.
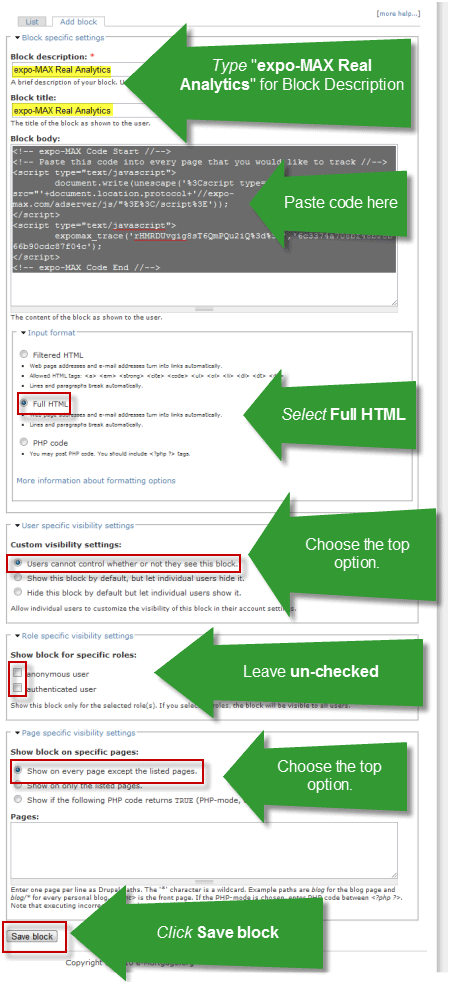
2. In the “Block description” and “Block title” fields, Type “expo-MAX Real Analytics.” Next, paste the
code into the “Block body” field. Under “Input format,” choose “Full HTML.” Next, choose “Users
cannot control whether or not they see this block” under “Custom visibility settings.” Leave both
checkboxes underneath “Show block for specific roles” empty. Lastly, choose “Show on every page
except the listed pages” under “Show block on specific pages.” When you’re done, Click
Save block.
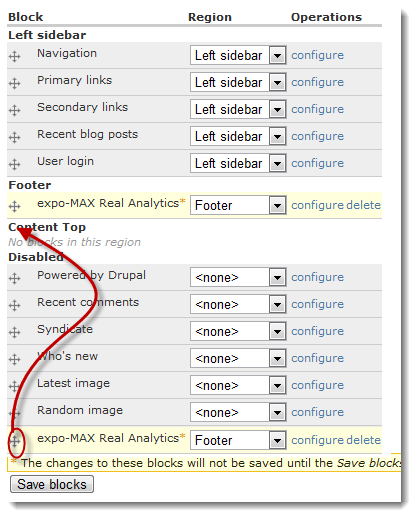
3. From the Blocks screen, Drag and Drop your newly created block from “Disabled” into the “Footer”
section.
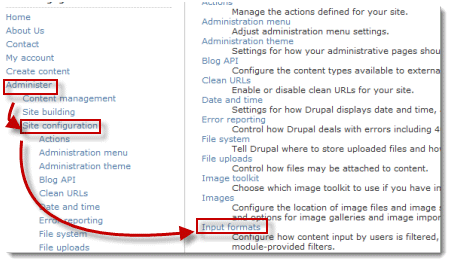
4. Next, Click Site Configuration from the Administer menu. Click Input formats.
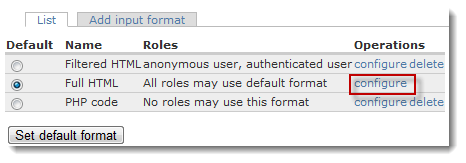
5. Click Configure next to “Full HTML.”
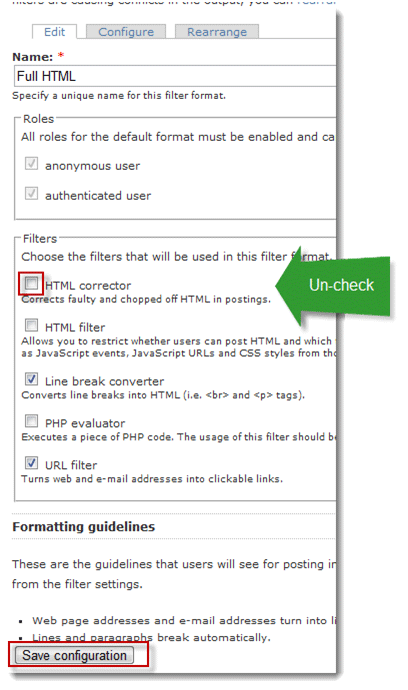
6. Un-check “HTML Corrector” underneath “Filters.” Click Save Configuration.
Advanced expo-MAX Real Analytics Drupal Setup
If you are an advanced user and have FTP access to your Drupal installation, you can use the following
set of directions instead. This takes less steps, but you’ll be editing files directly. (Note: If you
completed the above steps, you do not have to complete the next section.)
1. Using an FTP client, access the /THEMES/ folder and open the theme folder viewed by public users.
For example, if you are using Blue Zinfandel, find open /THEMES/bluezinfandel.
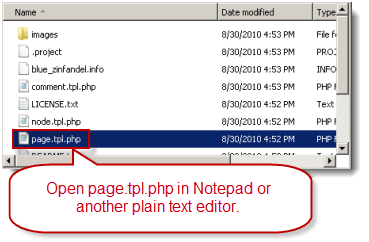
2. Open “page.tpl.php” in Notepad or another plain text editor.
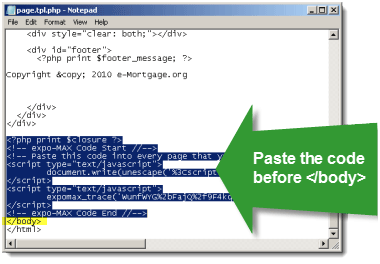
3. Scroll down until you find the </body> tag. Paste the code before the </body>
tag. Save the file. (If you downloaded a local version of “page.tpl.php,” you’ll need to upload the edited
version and overwrite the old version on the server.)
Following either set of instructions will embed the expo-MAX Real Analytics code onto each page on your Drupal
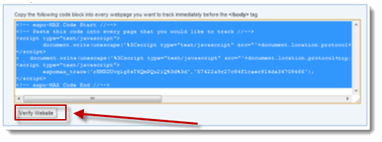
website. To ensure that the code installed correctly, Log in to your expo-MAX Real Analytics account and
Click Verify Website.
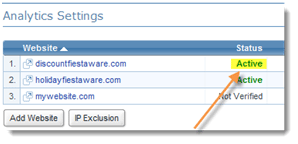
If successful, you’ll see Active underneath the Status heading next to your website.
Note: If you allow users to choose which themes display on your Drupal blog, you’ll have to complete the
steps in the Advanced Setup for each theme.
|
|
 | Sign Up Now |  |
|
|
|


